- Decorating
- DIY Tutorials
IKEA Dresser Hack: Faux Antique Card Catalog
Discover how to transform your Ikea dresser into a faux vintage card catalog with this budget-friendly Ikea dresser hack.
Today, I’m super excited to share a little project I’ve been working on: turning a plain wood dresser into something that looks like it’s straight out of an old library — a faux antique card catalog. This whole idea started because I’ve always had a soft spot for those charming old card catalogs you’d find in libraries, full of history and stories. But let’s be honest, finding a real one that doesn’t cost a fortune is pretty much like finding a needle in a haystack. So, I thought, why not make my own using an IKEA dresser? An Ikea Tarva dresser hack is way more budget-friendly than buying an expensive replica and adds such a cool, vintage vibe to the room.
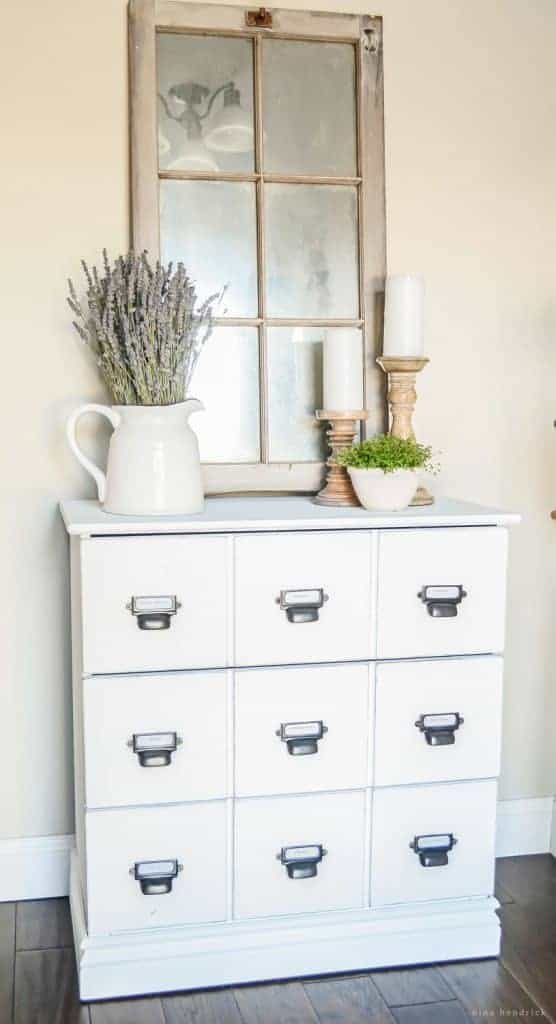
Note: While the IKEA Tarva dresser, the original star of this project, is currently not available, there’s good news on the horizon with rumors of its return in April. Meanwhile, this DIY project can be beautifully executed with the RAST 3-drawer dresser.
This isn’t just about making a piece of furniture look old; it’s about creating something that feels special and adds character to your space. If you love mixing a bit of the old with the new or just want a fun DIY project that won’t cost you an arm and a leg, you’re going to enjoy this. I’ll walk you through how to take a basic dresser and turn it into a chic piece that’ll catch everyone’s eye. Trust me, it’s a lot easier than you might think, and the end result is so worth it. Ready to give your space a little upgrade with a project that’s as fun as it is stylish? Let’s dive in!
This Ikea dresser hack not only saved me from spending over a thousand dollars on an antique card catalog but also allowed me to customize the piece to fit perfectly with my home’s aesthetic. By choosing the right stain, hardware, and applying a coat of paint, I gave this Ikea furniture a new life and a luxurious look on a budget. Whether you’re an avid DIYer or a beginner, this Ikea Tarva hack project proves that with a little creativity and effort, transforming Ikea dressers into bespoke pieces of furniture is within reach.
If you loved this IKEA dresser hack, you won’t want to miss my IKEA closet hack. It’s another budget-friendly makeover that can completely change the look and feel of your bedroom or entryway, giving you that custom-built vibe without the custom-built price tag.
So, if you’re ready to tackle more DIY projects and turn your home into a space that truly reflects your style, make sure to follow along. And hey, if you decide to give this dresser hack a try or have any other cool projects you’re working on, I’d love to see them! Share your photos and stories and tag me on Instagram. Happy hacking!
