- Entertaining
- Entertaining Basics
How to Make a Perfect Charcuterie Board
With this ultimate guide, you’ll learn all the tips and tricks for how to make a perfect charcuterie board. From selecting the best ingredients to arranging them in an attractive way, this guide of simple charcuterie board ideas will teach you how to create a spread that all your guests will enjoy!
A charcuterie board is a great way to dress up any gathering, from informal get-togethers to more formal events. Not only does it look stunning on a table, but it can also provide a variety of flavors for your guests to enjoy. A charcuterie board is an easy way to create a delicious and visually appealing appetizer that will wow your guests. In this blog post, I’ll give you instructions for how to make the perfect charcuterie board, from choosing the right meats, cheeses, accompaniments and other ingredients to arranging them in an aesthetically pleasing way. I’ll also provide some tips to ensure that your charcuterie board is the talk of the party!
During the holidays, my best friend invited me to a charcuterie board class at a local tavern. Not only was this a super fun girls’ night out idea, but I have been making charcuterie boards for years and I was curious about what the “proper” method was. It turns out, there’s no real wrong way to make a charcuterie board (phew)! However, I did learn some fun new tips and tricks that I’m going to share with you. I’ll also be sharing my easy step-by-step method for covering every square inch of the board with delicious treats to serve your guests.
This post contains affiliate links, which means I may get a small commission (at no extra cost to you) if you shop my link. Please see my disclosure if you’d like more info!
Where to Shop for a Charcuterie Board and Serving Pieces
You can find some great charcuterie boards that are handmade by artisans on Etsy. You can also look for vintage European boards made from salvaged wood, but be sure to place wax paper below your items for food safety. Last but not least, you may be able to find boards made by local artisans at gift shops.
For new boards, here are some of my favorites.


You can see the rest of my favorite entertaining essentials here!
Where to Grocery Shop for Charcuterie Food
My favorite national chains for charcuterie supplies are Whole Foods and Trader Joe’s. They both have extensive selections. However, I also like to visit my local farmer’s market, farm stands, and town grocers for homemade and locally sourced products. If you live close to a wine and cheese or gourmet food shop, they will have some great options—and help you with wine pairings for your choices!
The Basics for How to Make the Perfect Charcuterie Board, with Step-by-Step Photos & Instructions
Charcuterie (shahr-koo-tuh–ree) is a French term that refers to the art of preparing and assembling cured meats, cheeses, and other accompaniments. Charcuterie boards are the perfect way to entertain guests. Not only are they visually appealing and packed with flavor, but they are also very easy to assemble.
Step One: Make a Plan & Shop
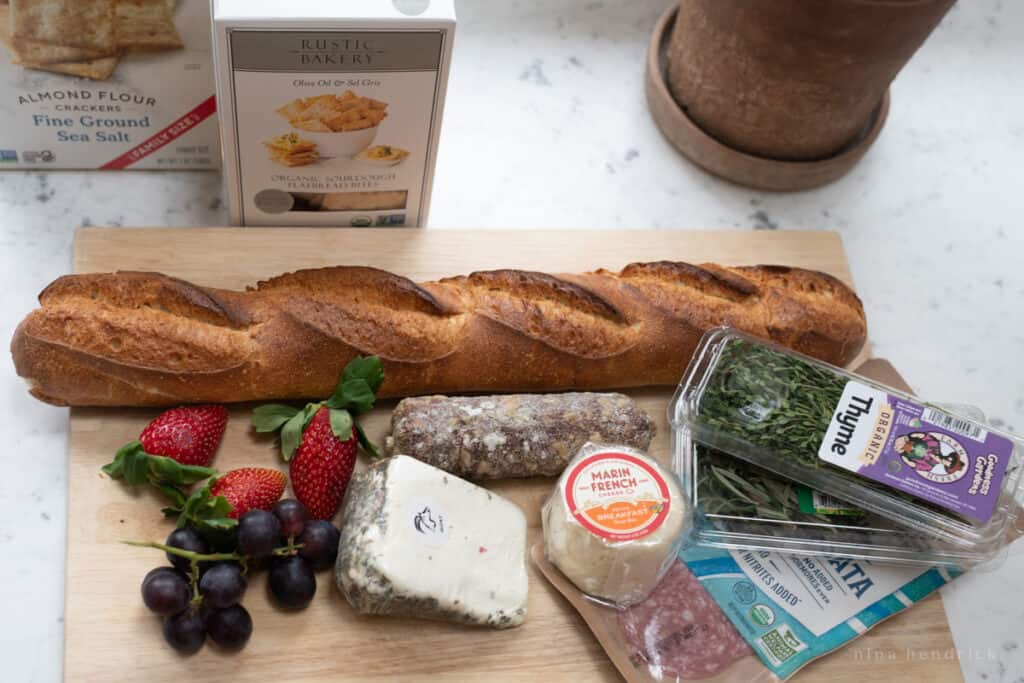
Before you go to the grocery store, it’s helpful to have a general idea of what you’re looking for. It can be overwhelming and intimidating to go up to that cheese counter with no idea what you’re looking for! There are just so many options. So, to eliminate analysis paralysis, here’s a wireframe plan of what you may want to include on your charcuterie board.

Tip from Nina: I’m a planner, so I get the appeal of making a list. However, shopping for meats, cheeses, and accompaniments can be full of exploration and fun surprises! Leave a little wiggle room in your plan for spontaneity and creativity in case a fun find at the grocery store sparks inspiration. At the end of the day, charcuterie board building is an art!
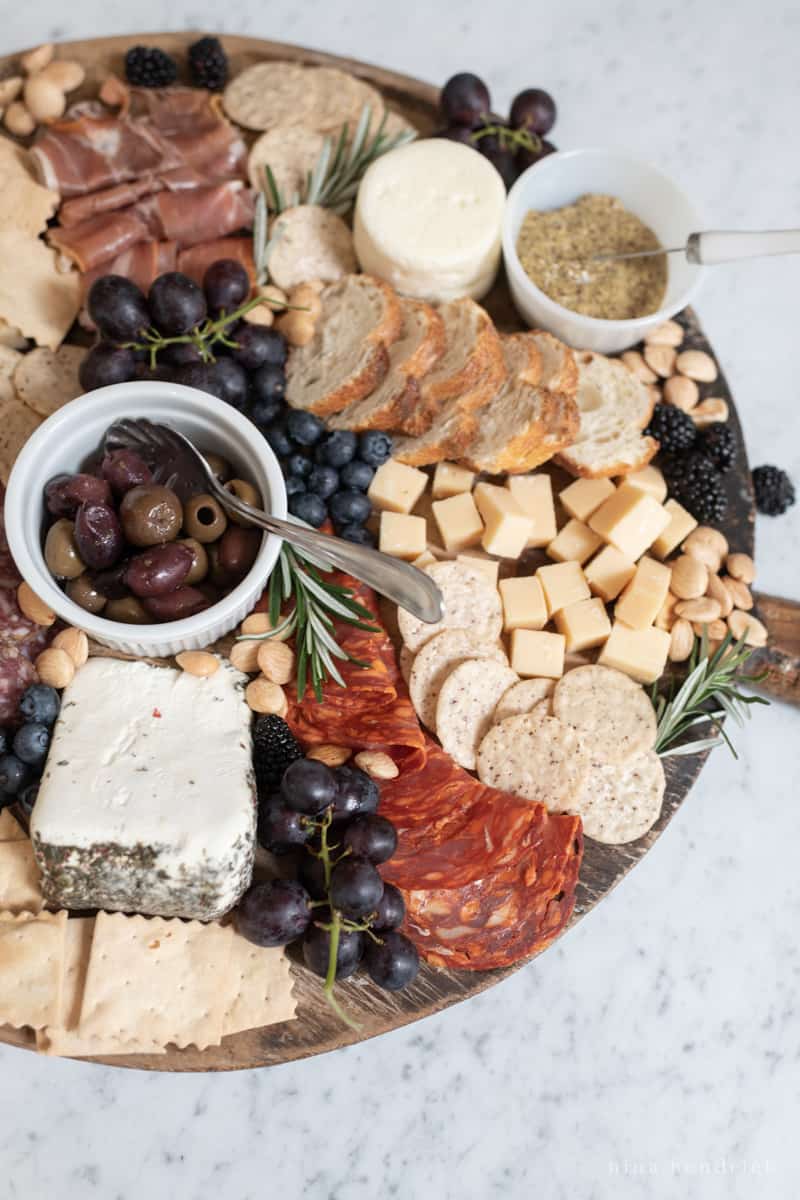
To start, select a variety of meats and cheeses to provide a range of flavors, textures, and colors.
3-5 Meats
Cured meats are the foundation of a charcuterie board. They are meats that have been preserved and seasoned through curing, a process that includes salting, smoking, drying, or a combination of all three. Often, herbs and spices are also added to enhance both the flavor and the preservation of the product.
Here are some ideas:
- salami
- pepperoni
- coppa
- bresaola
- chorizo
- prosciutto
- soppressata
- bacon
- jamón serrano or jamón ibérico
You can also change things up and include cooked meats like roast beef and turkey. Cooked meats add a nice warmth and texture to the board. Make sure to include an array of flavors when selecting meats. For example, you could include a milder tasting cured ham, a more intense smoked salami, and a spicy chorizo. Or you could throw in a surprise with candied bacon!
1-2 Condiments
Include condiments that pair nicely with each type of meat. Mustards, pickles, olives, and aioli work great with cured meats, while horseradish and pesto pair well with the cooked meats. You could also whip up a quick roasted red pepper spread for a pop of color.
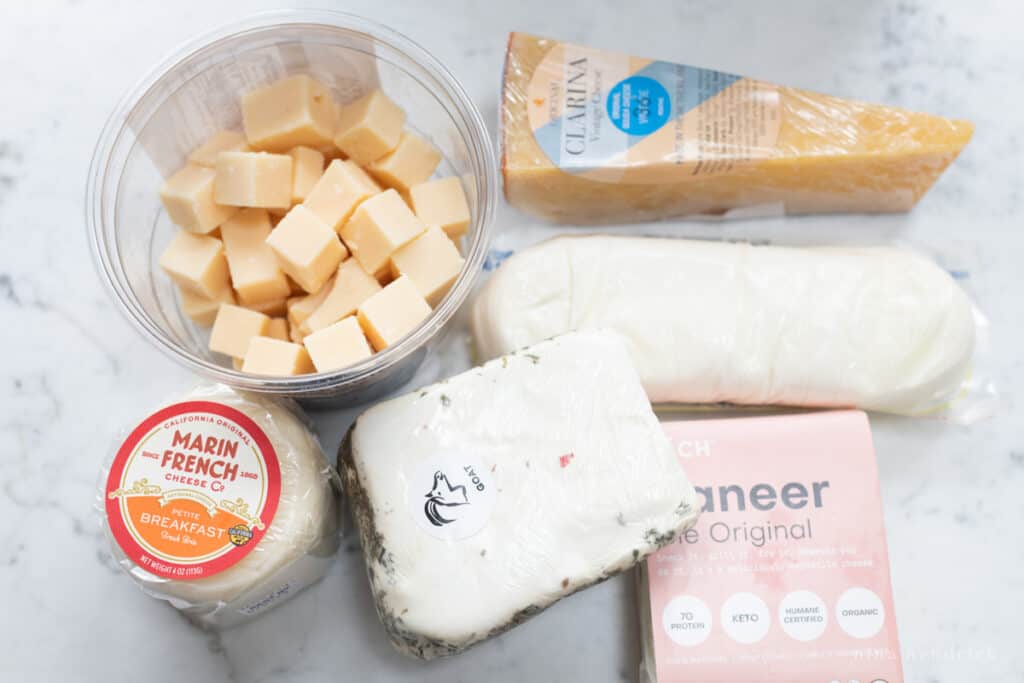
3-5 Cheeses
There are so many different types of cheese, and if you’re a fan, it can be fun to explore varieties from all over the world. The best rule of thumb when it comes to your charcuterie board is to choose three from different categories—hard, semi-firm, and creamy. It’s also a good rule of thumb to have one of the three cheeses be a “safe bet” for less adventurous grazers. For the other two, add some interesting flavors and textures.
Here are some of the basic types of cheeses:
- Cheddar: Mark this down as the “safe bet.” This hard cheese is a favorite for many. It’s a great addition to any charcuterie board because of its versatility and ability to pair with a variety of meats and fruits. Cheddar cheese can be served sharp, mild, or extra sharp, and it can be shredded, cubed, or sliced. For a similar but milder choice, look at Monterey Jack or Colby. Gouda ranges from mild to sharp, while Edam offers a nutty flavor.
- Parmigiano: Another “safe bet” hard cheese, Parmigiano has a hard, grainy texture and a strong, salty, and nutty flavor. It’s one your guests will be familiar with, but it still adds a layer of complexity to any cheese board.
- Alpine-Style Cheese: This includes semi-firm to hard cheeses like Swiss, Gruyère, Fontina and Beaufort. This type of cheese is produced in the mountains of Europe and has a distinct nutty, sweet, and buttery flavor. It is made from cow’s milk, and is aged for several months to a few years.
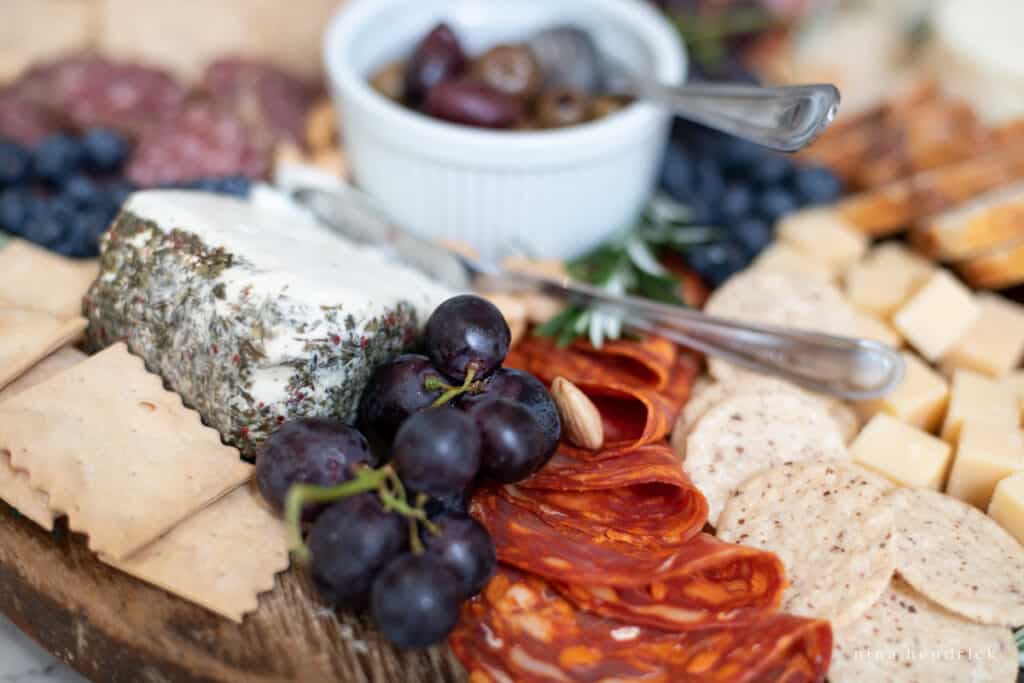
- Crumbled Cheese: Some popular crumbled cheese examples are feta, blue cheese, and goat cheese. These types of cheeses are a great addition to any charcuterie board because they provide a salty, creamy component and are a great way to add texture.
- Bloomy Rind Cheese: This is a type of soft, ripened cheese that has a white, velvety rind. The most popular choices are Brie and Camembert. Bloomy rind cheese is most often made from cow’s milk and can vary in texture, flavor, and aroma depending on the type of cultures used to age the cheese. It has a mild flavor that is slightly nutty, yet slightly sweet. It is best served at room temperature.
- Soft or Spreadable Cheese: Yet another “safe bet”! Creamy cheeses like fresh goat cheese, burrata, Gorgonzola, mascarpone, or even cream cheese are a must-have on any charcuterie board. They pair so well with jams and jellies and are a great way to mellow out the flavor profile of the board.
This is by no means a full list of the cheeses out there, but picking one from each of the different flavor categories on this list would give you a good variety for your board! If you’re in doubt when you get to the grocery store, you can ask your cheesemonger for recommendations—they are often so helpful and knowledgeable!
2-3 Crackers & Breads
A charcuterie board is not complete without a selection of crackers and breads. It’s important to include a vessel for your soft cheeses and spreads! Crackers add a crunchy element to the board and can be flavored with spices or herbs to add even more flavor. Artisan breads, such as flatbreads, baguettes, or focaccia, can also be served to add a variety of textures and a rustic look to the board. You can also include pretzels or hard breadsticks for an extra salty snack.
2-4 Fresh or Dried Fruits
You need to balance out all of the savory elements with some sweet bits! Fruits are a great way to add a sweet and juicy flavor to a charcuterie board. You can include a selection of fresh, seasonal, and/or dried fruits. Examples include strawberries, oranges, apples, blueberries, raspberries, pears, grapes, figs, and cherries. Dried fruits like apricots, bananas, raisins, and dates are also great to include. Not only does fruit balance out the flavor, but it can also add a fun pop of color and help you “theme” your board for holidays and seasons.
1-2 Nuts
Nuts like almonds, cashews, pecans, walnuts or macadamias are a great way to add crunch and flavor to your board. Flavored nuts like everything bagel almonds, truffle marcona almonds, or candied pecans always get a great response as well!
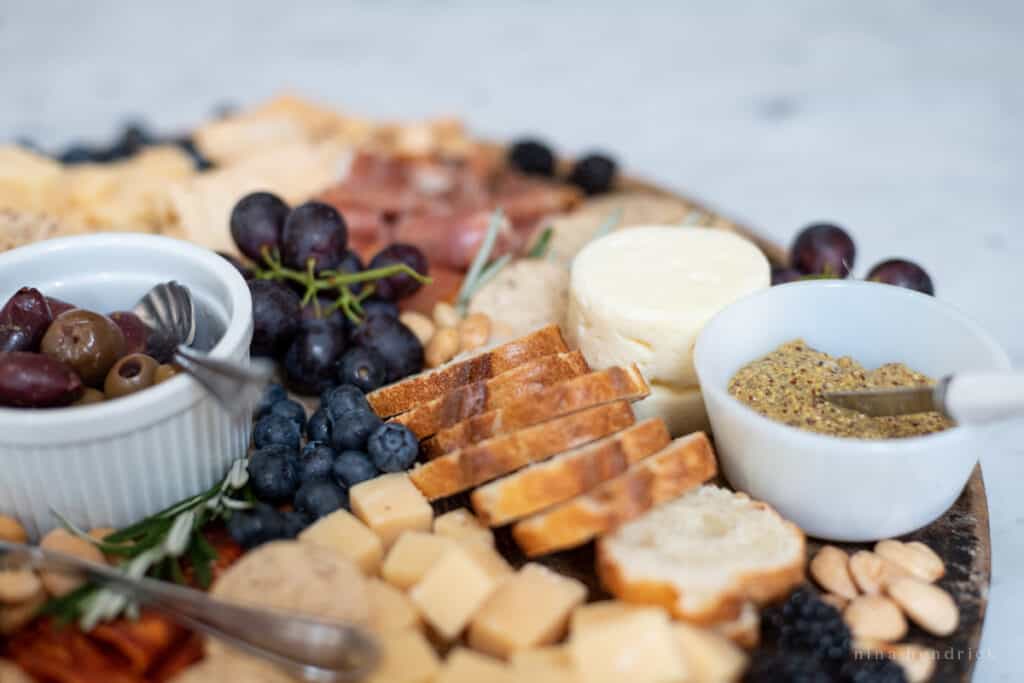
1+ Fruit Spreads, Honey, Fresh Herbs, & Other Accompaniments
Fruit spreads like fig jam or red pepper jelly will help add the finishing touch to your charcuterie board. Honey makes a good sweet topping for your guests to drizzle over their bites. Fresh herbs like rosemary, basil, and thyme are a great way to add some flavor as well as a hint of color to your charcuterie board. For a bit of heat, add some chili flakes or pickled jalapenos. Dill or butter pickles, pickled vegetables, and marinated artichokes are a great way to add a tart and tangy bite to the board. Depending on how much space you have on your board, you can include as many or as few of these items as you wish!
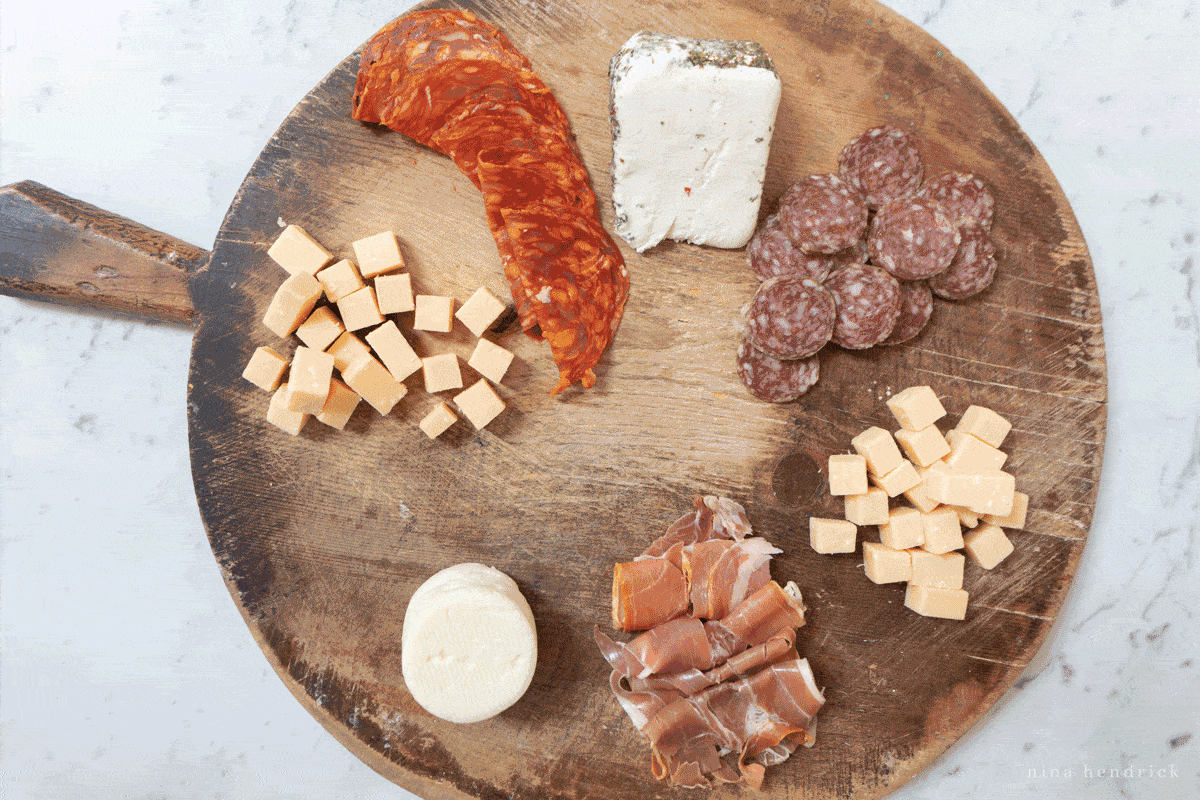
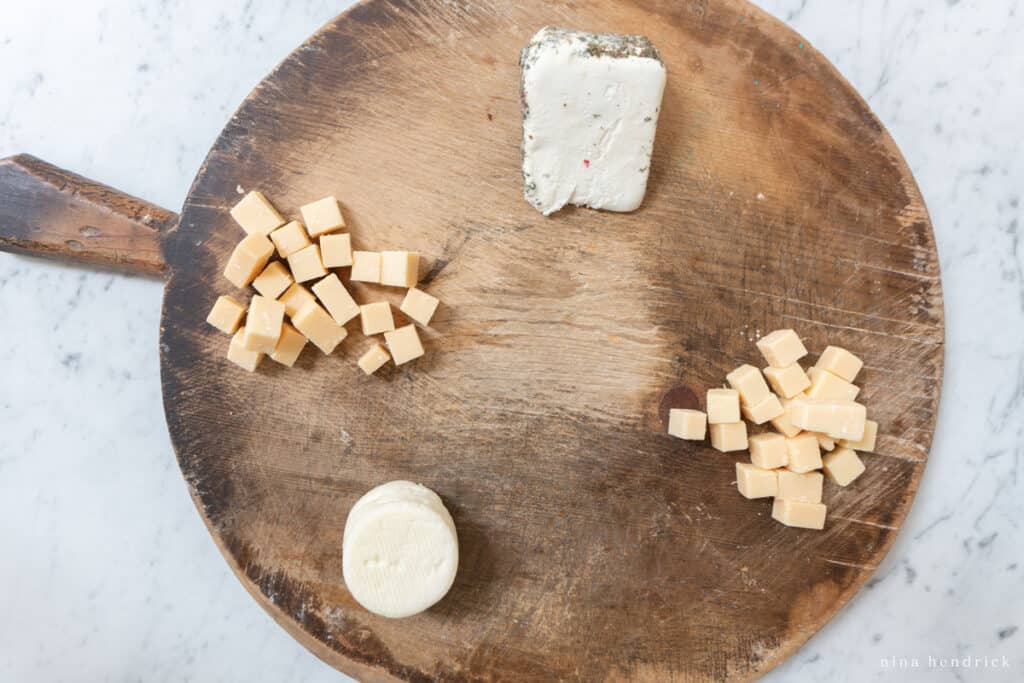
Step 2: Slice & Prepare Your Meats & Cheeses
The first step is to slice and prepare your meat and cheeses. While some will allow a more rustic cut, others present best thinly sliced. I find this to be the most difficult part, as my knife skills are admittedly somewhat lacking. If you’re in the same predicament, or you’re just looking for a shortcut, this mini meat and cheese slicer is a game-changer! Or if you’re short on storage space, you can try this handheld mini cheese slicer, which has thousands of positive reviews.
Step 3: Evenly Space Your Cheeses on the Board
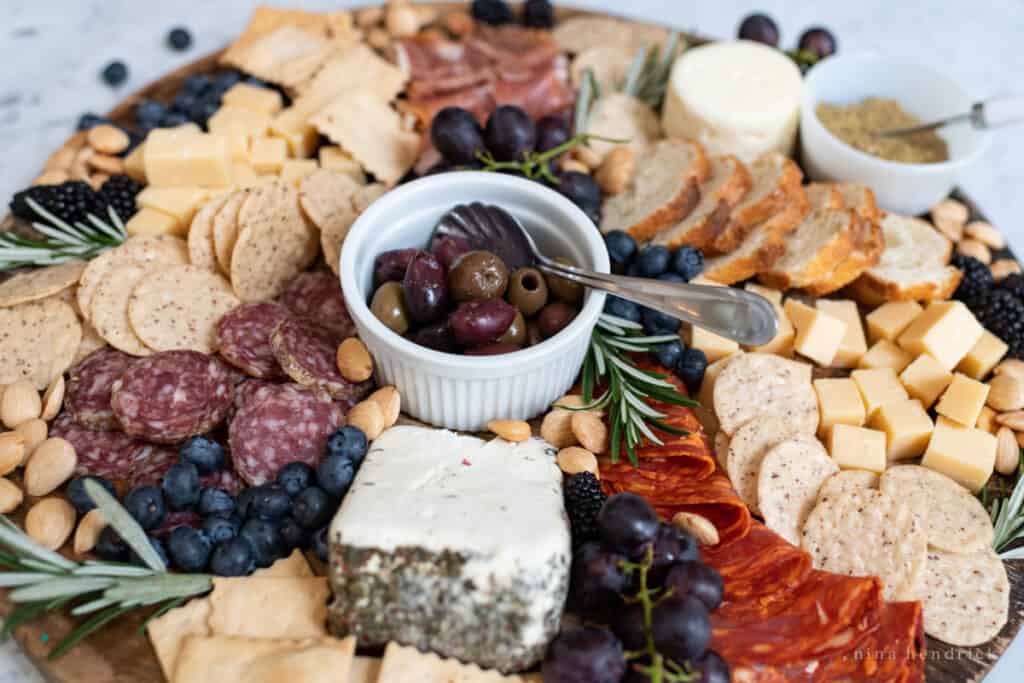
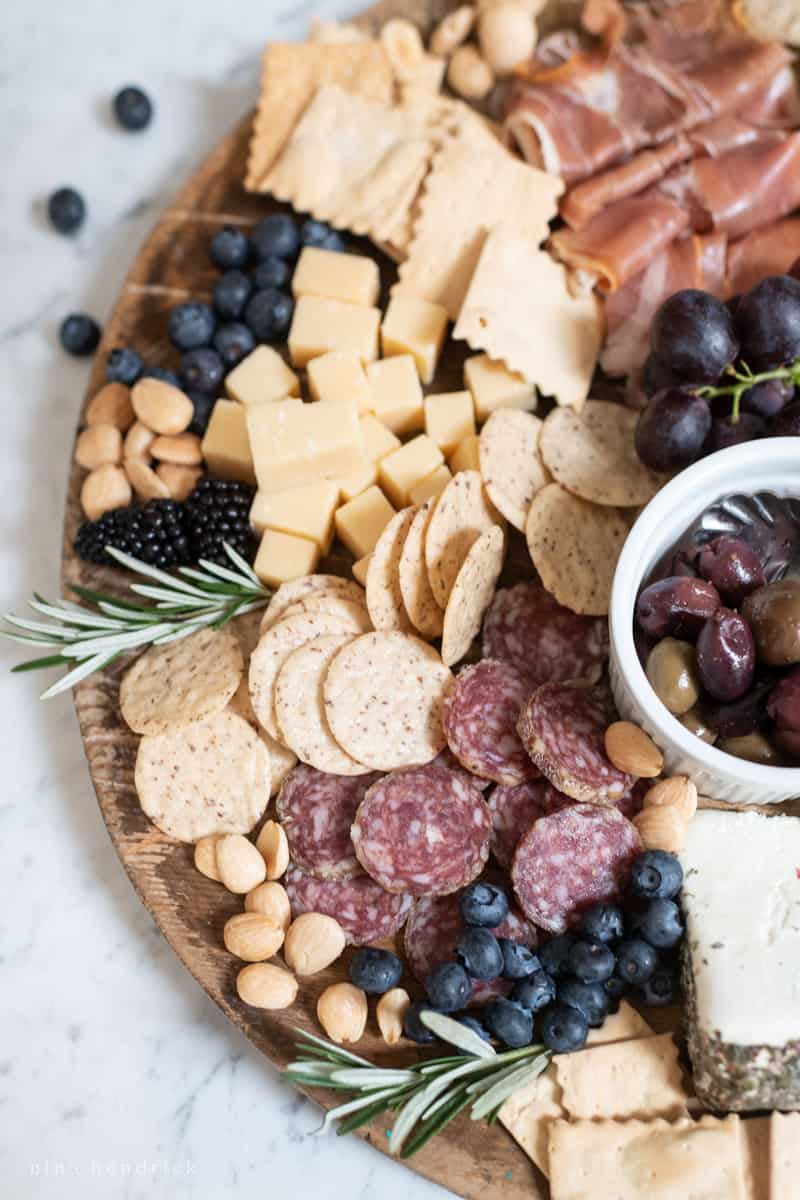
To create the perfect charcuterie board, the third step is to evenly space the cheeses on the board. It’s important to give each cheese its own space and to not overcrowd the board. Depending on the size of your board, you can choose to place one large cheese, three medium-sized cheeses, or five small cheeses. Mix up the types on the board for a more interesting presentation, varying between soft and hard cheeses, starting from the top left corner to create a visually pleasing arrangement. Cut open any cheeses with a rind to encourage your guest to dig in (remember to leave extra space for gooey cheeses, like brie!). Once you’ve placed the cheeses, you can move on to the next step and add the cured meats.
Labeling Items
It can be helpful to label the various items on the board, especially if you’ve gone for a more experimental flavor profile. This can be done by creating small tags with the name of each item written on it and then taping it to a toothpick or skewer and inserting it next to the item. The labels make it easier for guests to identify the items and can help prevent confusion. Additionally, labeling items is a great way to share information about the items such as their origin, ingredients, or other interesting facts. Labeling charcuterie items can truly enhance the experience for guests.
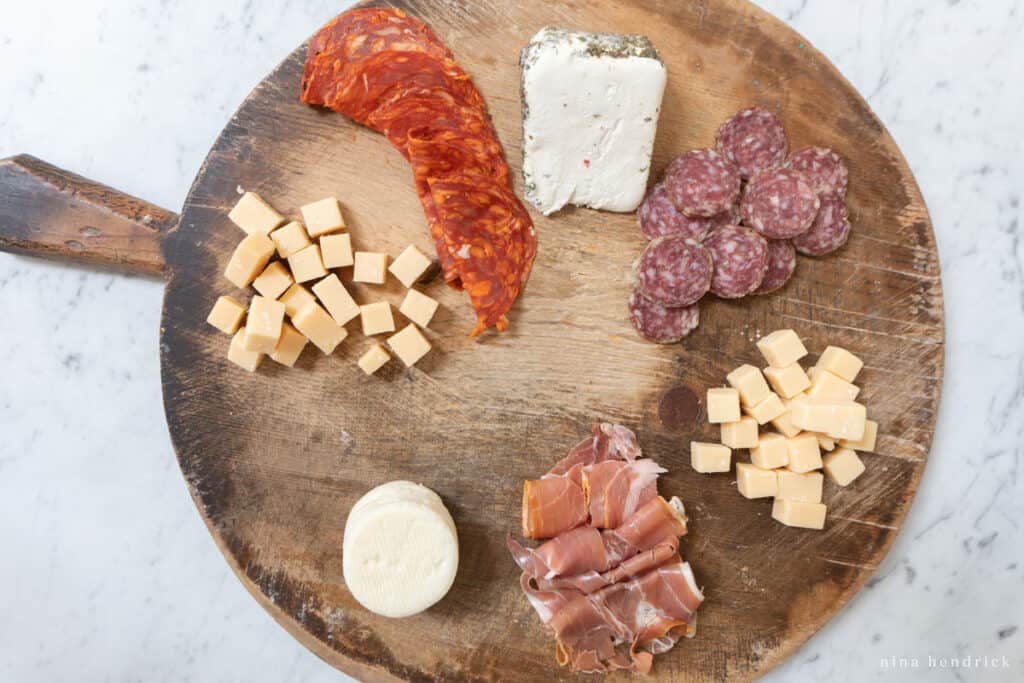
Step 4: Add Your Meats to the Charcuterie Board
Place the meats in a similar way as you did the cheeses. Slice the salami, prosciutto and other meats into thin pieces and arrange them around the board. Place the cured meats in a way that the guests can easily pick them up. You can also arrange the meats in a design or fan-like pattern if you wish. Place the meats in a way that makes it easy for your guests to grab.
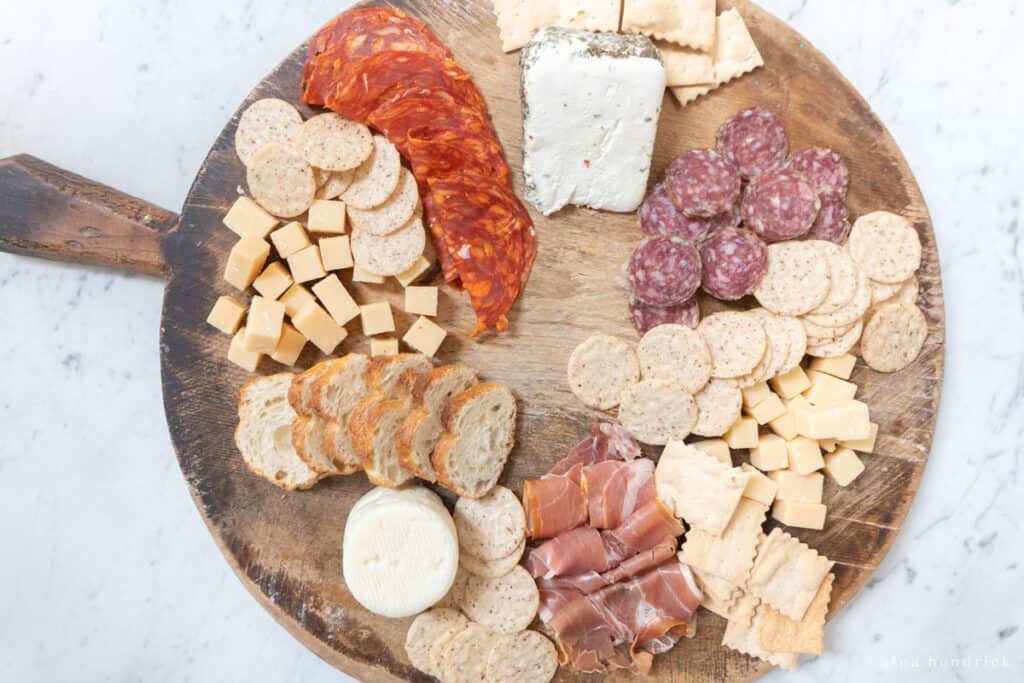
Step 5: Place Your Crackers and Breads
Once the meats and cheeses are arranged on the board, it’s time to add the crackers and breads. These can be arranged in a small basket, scattered around the board, or stacked in a neat arrangement. Make sure to evenly space your carbohydrates around the meats and cheeses.
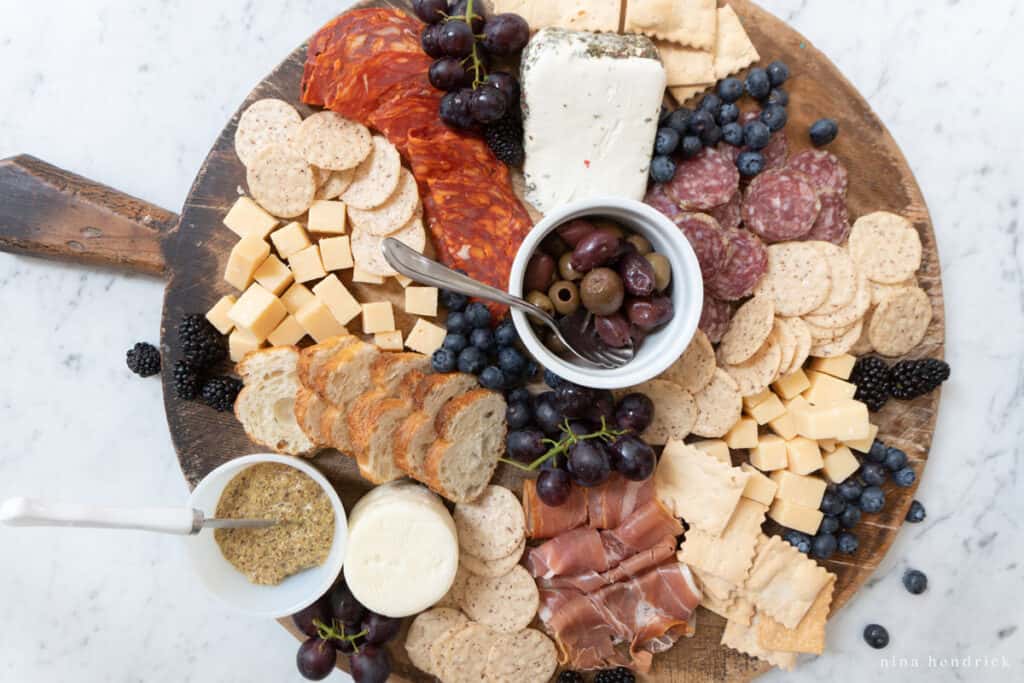
Step 6: Add the Fruit
The next step to making the perfect charcuterie board is adding the fruit. This will provide a nice balance to the salty and savory flavors of the meats and cheeses. If you’re feeling creative, you can arrange the fruit in an aesthetically pleasing way. For example, you can place a few pieces of fruit in the middle of the board, or you can arrange it in a pattern around the edges. To really make your charcuterie board stand out, you can cut some of the fruit into unique shapes, such as stars or crescents. Or, you can serve the fruit in a variety of different ways, such as slices, wedges, cubes, or halves. Whatever you choose, adding fruit to your charcuterie board is sure to be a hit.
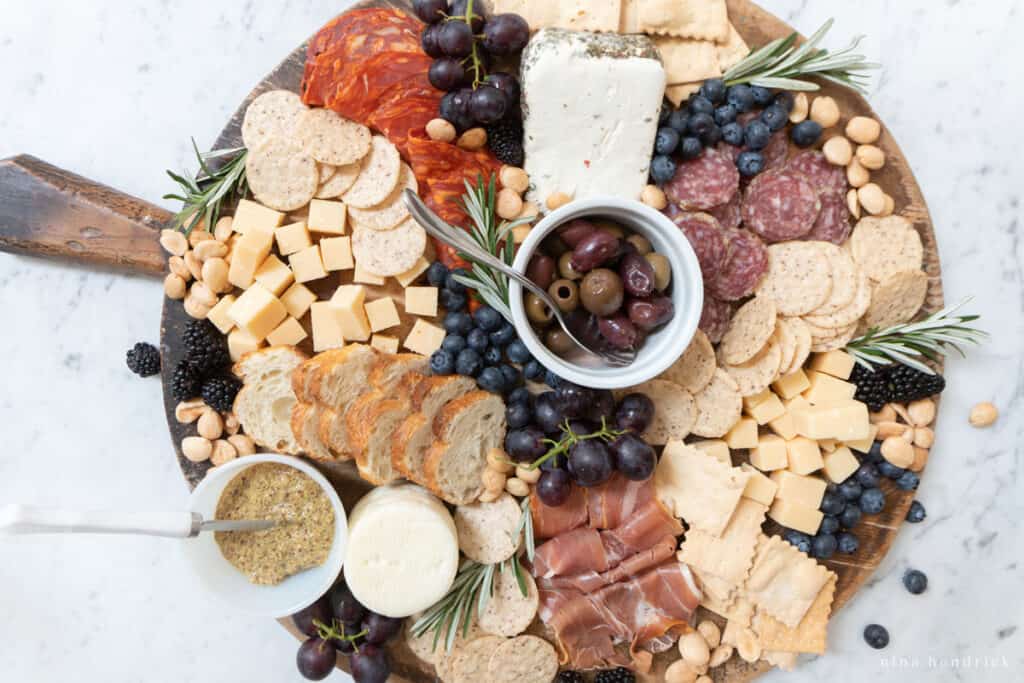
Step 7: Fill the Board in With Everything Else
Once the foundation items have been added to the charcuterie board, the final step is to fill in the board with all the other small items you’ve chosen. This could include items like olives, nuts, pickles, jams and jellies, condiments like mustard, honey, and other spreads. When arranging these items, try to include a variety of shapes, sizes, colors, and textures. Finally, it can be helpful to include some decorative elements, like slices of citrus, edible flowers, or sprigs of herbs to add visual interest and make the board more inviting! Now you’re ready for your guests to dig in.
More Charcuterie Board Ideas:
- Create a “themed” holiday board in the shape of a Christmas tree.
- Instead of meats and cheeses, use candy and snacks for kids.
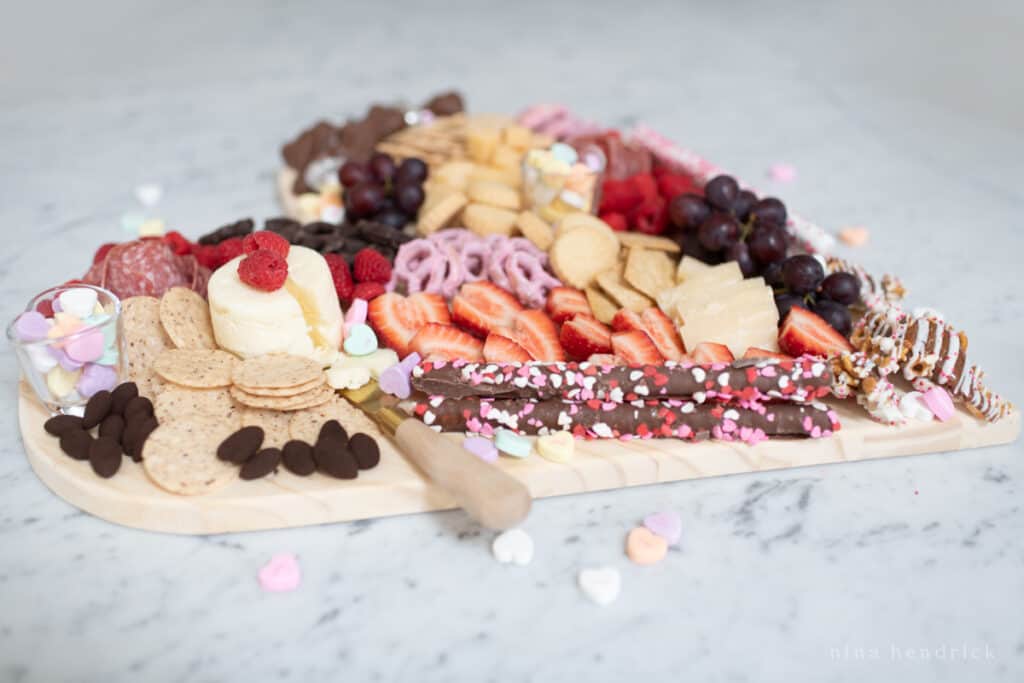
- Cut fruit into hearts and include a bunch of salami roses and real flowers for Valentine’s Day.
- If you’re hosting a game night, put together a board of game-inspired snacks including cheese cubes, crackers, and salami cut into game pieces.
- For a summer cookout, include a variety of cold cuts like turkey, ham, and salami, along with a variety of cheeses and a selection of pickled vegetables. Top it off with some fresh fruit and vegetables, and add a few dips and slaws.
- For a book club charcuterie board, include items that relate to topics in the story or places the character visits.
- Create a spooky board for Halloween with normal food items repurposed to look gross or scary. Think bleu cheese, slivers of almonds for fingernails, and olives as eyeballs.
- Make a bonfire-themed board, include items to make and customize s’mores, such as graham crackers, marshmallows, chocolate, and other fun items to dip the s’mores in!
- For a kid-friendly board, use colorful shapes of cheese and meats, as well as cut-up fresh fruits and vegetables.
- Make an all-vegetarian board, try a variety of nuts, olives, pickles, and crackers, as well as roasted vegetables and creamy dips.
- Create a board with items specifically from one place, like an all-French or all-Italian board.
The beauty of charcuterie boards is that they can be customized to your own tastes and preferences. Whether you’re looking for a savory snack or a more elaborate spread, there’s something for everyone.
I hope these instructions and ideas made the process of how to make a charcuterie board simple and approachable. I’m excited to see what you create! Snap a photo of your finished board and share it with me on IG @ninahendrickhome. Make sure you’re following along to see some of my own boards each season.
Charcuterie boards are a great way to bring people together. Plus, they are simple to put together. Last but not least, they’re so pretty! So the next time you are looking for an easy and delicious way to entertain, turn to the classic charcuterie board!
