- Bathroom
- DIY Tutorials
- Renovating
PVC Shiplap: How to Plank a Wall with PVC
Learn how to plank a wall with PVC! Moisture-resistant PVC/AZEK is the perfect material for creating a faux “shiplap” planked wall in your bathroom or outdoors. Get the how-to tutorial here for recreating this coastal-inspired look.
Are you looking for a durable, water-resistant wall treatment for your bathroom? PVC (AZEK) “shiplap” is the perfect solution! In this post, I’m going to show you how to install PVC shiplap in your bathroom like a pro. I’ll go over the tools you need, the steps to take, and some helpful tips to make the job easier. By the end of this post, you’ll have the knowledge and confidence to tackle this project with ease.
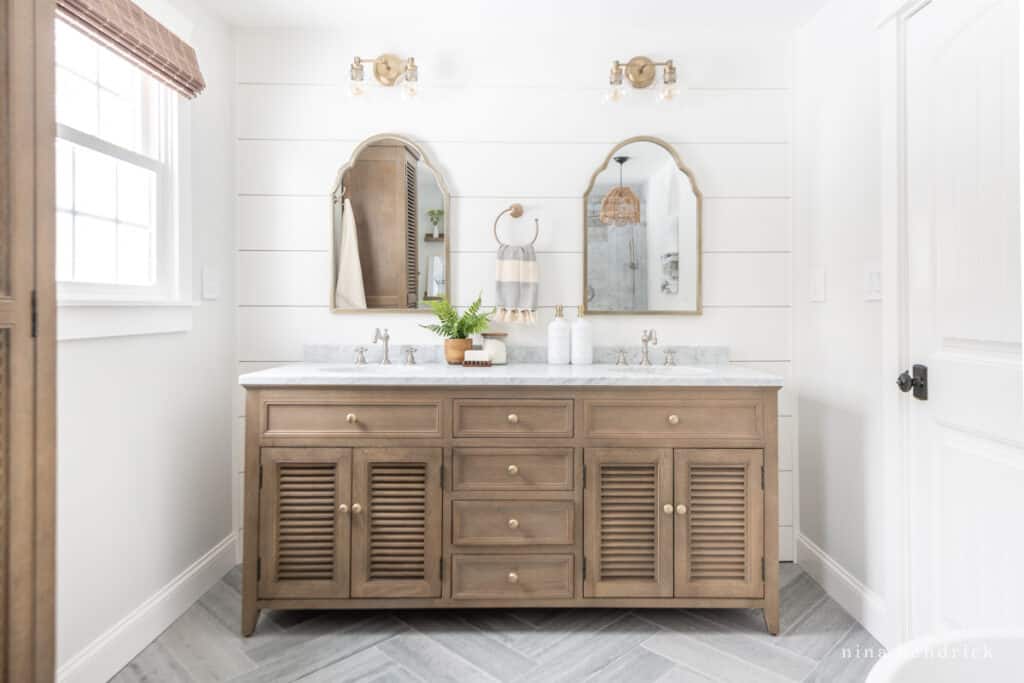
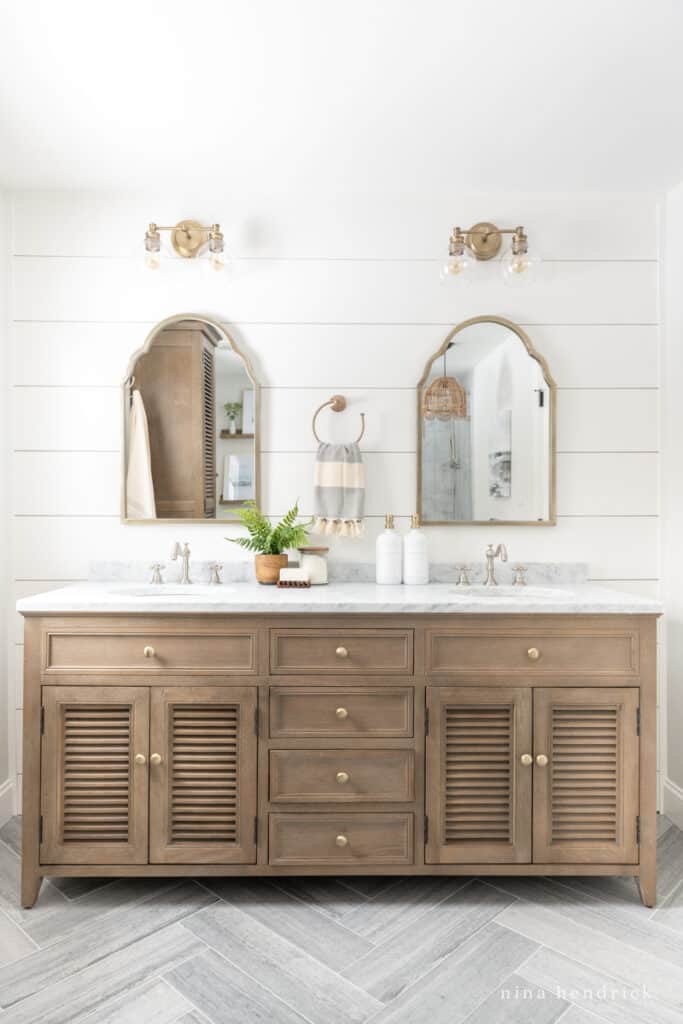
When I planned the design for our primary bathroom project, I knew I wanted to implement some sort of “shiplap” treatment. However, with this being a high-moisture area, I also knew it would be best to use PVC trim, more commonly known by the brand name AZEK (not a sponsor, this is just what we bought).
We’d already done a planked wall treatment in our dining room and then we used the same method to plank our laundry room. Our breakfast nook bench also had a planked front. So I knew doing this would tie-in with my goal of a coastal vibe as well as complementing the other planked areas in our home.
However, it also dawned on me that having a wall of wood in the bathroom may not be the best idea. We recently completed our exterior project, which involved replacing rotting wood trim and siding with lookalike high-end synthetics. So I thought, why not do a PVC/AZEK planked wall in the high-moisture bathroom too?

Can you use PVC for “shiplap” in a bathroom?
Absolutely! PVC is an ideal material for bathrooms. It’s easy to install as a faux “shiplap”, and its waterproof properties make it perfect for high-moisture areas. It is also durable and low maintenance, so it will look great for years to come. PVC Shiplap is also easy to clean and is mold and mildew resistant.
Note: When it comes to cost, it is important to keep in mind that this project is not budget-friendly. AZEK/PVC is expensive; in fact, the materials alone cost us around $600. Although it was worth it for the waterproof wall treatment, it is something to consider, especially if you are hiring out the work, as labor costs will also need to be factored in.
PVC Shiplap for Bathroom Wall Tutorial
Other Ideas for Where to Install Moisture-Resistant Planks
This wall treatment is not just for interior walls. Consider adding a PVC plank accent wall to your outdoor living area, such as a porch or patio, to give the space a cozy, rustic feel. PVC shiplap can be used just about anywhere you’re looking for a durable, moisture-resistant wall treatment solution. With its easy installation and versatility, PVC trim is a great material to use for many home improvement projects.
- Ceilings
- Porch
- Outdoor shower
- Kitchen backsplash
PVC shiplap is a great choice for home improvement projects that require a durable, low-maintenance and waterproof material. It is easy to install, affordable and can be used indoors or outdoors. It can also be painted to match any decor. PVC shiplap is a great option for a long-lasting, beautiful look that will last for years to come.
I hope this tutorial made it easy for you to add this coastal look to your home. If you end up installing this wall treatment, share a photo with me @ninahendrickhome! I love to see what you create.
